Should you brush your teeth before or after breakfast?

How do you start your day?

Perhaps a quick run followed by a cold shower? Hitting snooze three times before getting out of bed? Trying to convince your 5 year old to put on their coat and shoes?

Everyone’s morning routine is different. But there’s one thing we should all be doing in exactly the same way, at exactly the same time. That is, brushing our teeth before we eat breakfast – not after.

Surprised? Most people assume that cleaning your pearly whites after breakfast is better. After all, surely it helps to remove any leftover food debris and start the day with fresh breath?

Whilst those things are true, it’s actually much more beneficial to brush before your bowl of porridge. As soon as the alarm clock goes off, we should all (ideally) be jumping out of bed and reaching straight for the toothbrush. Here’s why.


4 reasons to brush before your bran flakes


1. Clear overnight bacteria

Breakfast foods are notorious for containing sugary carbohydrates. Cereals, breads, waffles, pancakes – they all contain the stuff that plaque-causing bacteria love to feed on. And when you wake up in the morning, the level of bacteria inside your mouth is at its highest.

This creates the perfect conditions to wreak havoc on your teeth.

As you tuck into your bagel, the bacteria begin to flourish – feeding on the sugary carbs, multiplying even further and releasing acids that can damage the enamel.

Brushing your teeth before breakfast helps to clear away the bacteria that has accumulated inside your mouth overnight. If it’s not there, it can’t do any harm. Plus, the fluoride in the toothpaste will create a protective barrier and defend your enamel against acids in breakfast foods.


2. Avoid tooth erosion

Brushing too soon after eating a meal can also damage the enamel layer of the tooth.

This is particularly true after eating acidic food and drinks, such as those typically consumed at breakfast (e.g. fruits, orange juice, coffee). The bristles of the toothbrush can actually brush the leftover acid into the tooth, gradually wearing away the enamel to reveal the dentin beneath.

This is known as ‘tooth erosion’ and can lead to a range of symptoms, including discolouration.


Brushing teeth before breakfast


3. Kick-start saliva production

Saliva is a fantastic protective force.

Not only does it deposit minerals that help to strengthen your teeth, it helps to break down food, neutralises acidity and naturally kills any harmful bacteria that may be lurking in your mouth.

Unfortunately, though, saliva production diminishes dramatically during sleep. This is part of the reason why bacteria can multiply through the night, and we often wake up with a dry mouth.

Brushing your teeth as soon as you get up is an easy way to kick-start normal ‘daytime’ production, therefore creating another line of defence against the acid in breakfast foods.


4. Make sure you remember

How many times have you scarfed down your beans on toast in the morning, and rushed out the door without a second thought for your oral hygiene? Whether you start work super early or need to get the kids ready for school, cleaning your teeth can often be the last thing on your mind.

Which is why it’s a good idea to get it done and dusted early doors.

Brushing prior to breakfast reduces the chances you’ll run out of time or forget to do it later. Then, all you need to do afterwards is give your mouth a quick rinse to clear away any food.


Prefer to stick to your usual routine?

If you’re set in your ways and would prefer to continue brushing your teeth after breakfast, this can be ok – providing you take a few precautions to lessen some of the effects outlined above.

For example, to avoid enamel erosion, try to wait at least 30-60 minutes after eating before you brush – and in the meantime, either rinse with or have a drink of water. This will remove any lingering food and allows enough time for your saliva to neutralise the pH balance of your mouth.

When you do get around to brushing your teeth, it also helps to use a soft-bristled brush.


Breakfast


Worried the damage may already be done?

Even if you’re in the habit of brushing your teeth after breakfast, enamel erosion takes a very long time. But some of the earliest signs include:

  • discolouration of the teeth
  • increased sensitivity to taste, texture and temperature
  • cracks and chips
  • indentations (known as cups) on the surface of your teeth
  • pain

If you do notice any of these symptoms, it may be worth booking a routine check-up.

Unfortunately, erosion isn’t reversible. But having assessed your overall oral health, we can identify the issue and provide tailored advice on how it could potentially be treated (e.g. composite bonding, veneers etc.) and how to prevent the damage from becoming any worse.

Alternatively, for further tips on effective brushing habits, why not make an appointment with one of our dental hygienists? These are available to absolutely everyone – including members and non-members – and are a fantastic opportunity to learn more about the best oral hygiene practices.

Simply use our online booking system to choose a time and date that works for you.

Or if you prefer, you can either give us a call on 01744 25775 or send an email to info@kilnlanedental.co.uk and we’ll respond to your enquiry as soon as possible.



How to floss

Only 31% of people in the UK floss their teeth on a regular basis.

Be honest – how often do you do it?

Once a day? Once a week? Never?

Flossing is an important oral hygiene habit. Just as important, in fact, as brushing your teeth twice a day. It helps to dislodge any food particles and remove harmful plaque. And the official NHS guidance is that we should all start from around the age of 12. So why do most of us not bother?


Dental floss and toothbrush


Often, it’s because people simply don’t know how to floss – or at least, they don’t know how to do it correctly. So to set you on the right foot (and hopefully encourage more people to have a go!), here our dental hygiene experts outline the best technique.

Why not give it a try?

Make today the day that you learn how to floss properly. And ensure you’re giving those pearly whites of yours the best possible chance of staying healthy.


5 steps to floss your teeth like a pro


Step 1: Tear off 45cm

Step 1 how to floss

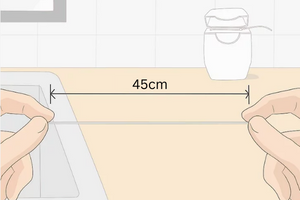
To make it easier to grip, start by tearing off a strand of dental floss around 45cm long. This may sound like a lot, but you’ll need enough to use a new (clean) section every time you move from one tooth to the next.

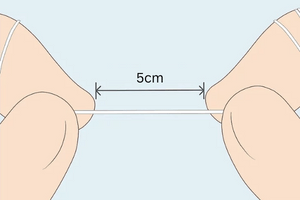
Wrap most of the floss around the middle finger on one hand, and a small amount on the middle finger on the other – leaving approximately 5cm for use in the centre.


Step 2: Hold the dental floss taut

Step 2 how to floss

Next, use your index fingers and thumbs to pinch the dental floss and pull it taut – so there isn’t any slack in the middle 5cm section.

This will make it much easier for you to manipulate and slide between your teeth.


Step 3: Guide the floss between your teeth

Step 3 how to floss

Now you’re ready to start flossing.

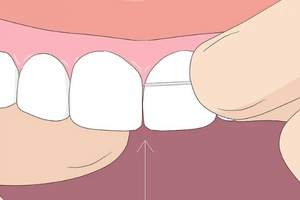
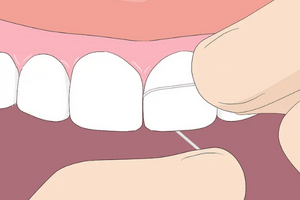
Using a ‘rocking’ motion that goes up and down (rather than backwards and forwards), guide the floss between two teeth and move it slowly up towards the gumline – gently scraping against the sides of each tooth as you go.

Try not to snap the dental floss. And avoid pushing it up too forcefully, as this can sometimes hurt the gums and cause bleeding.


Step 4: Curve the floss

Step 4 how to floss

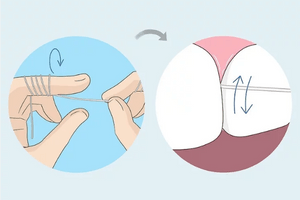
Once you reach the gum line, curve the dental floss so it presses tightly against the side of the tooth – essentially forming a ‘C’ shape.

Work the floss back and forth between the gums and tooth (around 8-10 strokes), to break apart any plaque. Then, gently scrape the side of the tooth from top to bottom.

Repeat this process on the opposite side.


Step 5: Continue around the mouth

Step 5 how to floss

As you move from one tooth to the next, unroll a fresh section of dental floss from the middle finger on one hand, whilst rolling the ‘used’ section of floss onto the other.

To avoid missing any teeth, try to start at the top and work your way from left to right. Then repeat this on the bottom. And don’t forget to do the back of the very last tooth (and any that border empty spaces).


Get one-to-one advice from our dental hygienists

Still not convinced that you’re flossing correctly?

The best option may be to pop into our practice.

Appointments with our dental hygienists are available to absolutely everyone – including members, non-members and even patients who receive their routine dental care elsewhere. And they’re a fantastic opportunity to learn more about good oral hygiene habits.

Our experts can demonstrate exactly how to use dental floss, offering tips and advice on the best, most effective technique. And to get you off to a great start, they’ll also perform a full  ‘scale and polish’, professionally cleaning your teeth and removing any stubborn and difficult-to-reach plaque.

To book yours, simply use our online booking system and choose a time and date that works for you. Or if you have any questions – about flossing your teeth or the dental hygiene treatments available at Kiln Lane Dental  – you’re always welcome to get in touch.

Either call us on 01744 25776 or send an email to info@kilnlanedental.co.uk and a member of the team will respond to your enquiry as soon as possible.


How often should you change your toothbrush?

Be honest – when was the last time you changed your toothbrush?

Can’t remember?

If so, you’re probably ready for a new one.

Your toothbrush is your first line of defence against bacteria and plaque and replacing it at the right time is essential for maintaining your oral health. But it can be difficult to know when it’s nearing the end of its natural lifespan. So to clear up some of the confusion, here our dental experts give their opinion on when to toss out your old and battered bristles.


The average lifespan of a toothbrush

The lifespan of a manual toothbrush will depend on several factors, including the type and quality of the brush, how often it is used and whether you look after it properly. But as a general rule-of-thumb, you should aim to swap it out at least once every 3-4 months.

Why so often?

Every time you use your toothbrush, the bristles are exposed to pressure, water, and chemicals from the toothpaste. This can make them gradually weaker and, as they lose their stiffness, they will start to fray and twist into a new shape  – in a process known as ‘bristle flaring’.

Bristle flaring significantly reduces the effectiveness of your toothbrush. Unable to reach spots between the teeth and along the gumline, the bristles won’t achieve a thorough clean. And studies have shown that a flared toothbrush can lead to a considerable build-up of bacteria and plaque, which, over time, can cause issues such as tooth decay and gum disease.


Difference between old and new toothbrush


Reasons to change your toothbrush earlier

The above guideline applies if you follow the normal routine of brushing twice a day and take proper care of your toothbrush. But there are some circumstances in which you should say goodbye to your old toothbrush before the 3-4 month recommendation. For example:


  • If your manual toothbrush looks visibly worn

Take a look at your toothbrush. Are they any obvious signs of deterioration? Does it look clean and fresh? If not, replace it. It’s also a good idea to keep a close eye on the bristles. They should be straight, springy, and sturdy enough to brush away food particles.


  • If you use an electric toothbrush

The bristles on an electric toothbrush tend to be shorter than those on a manual model. Therefore, they fray more quickly and will need to be replaced more often. We recommend changing the head once every 12 weeks and watch out for signs of wear and tear on the bristles.


  • If you or a family member has been sick

Whilst you’re unlikely to reinfect yourself, germs can survive on a toothbrush for up to three days. If you keep your toothbrush next to the rest of the family’s, it’s very easy for those germs to spread – particularly viral and bacterial infections such as strep throat. So if you’ve been sick, the safest option is to get rid and invest in a new toothbrush for everyone.


  • If the toothbrush belongs to a child

Children tend to gnaw on the handle or squeeze the toothbrush head between their teeth. This can significantly lessen its effectiveness. Therefore, it’s usually worth changing a child’s toothbrush more often than adults – and always ensure they rinse the brush head thoroughly after each use.


  • If someone else uses your toothbrush

It doesn’t matter if it was your partner, child, a close friend, relative. If someone else has picked up your toothbrush by accident, it’s time for a replacement. Everyone’s mouth harbours different bacteria and, for the sake of buying a new one, it isn’t worth the risk of infection.


Team at Kiln Lane Dental


How to maximise the lifespan of your toothbrush

One of the easiest ways to maximise your toothbrush’s lifespan is to invest in a high-quality product.

Although the right type for you comes down to personal preference, electric models do offer a number of advantages and we highly recommend the Icy Bear Sonic Whitening Toothbrush. Using advanced sonic technology, this provides powerful cleaning action and features durable DuPont brush heads that are designed to last.

It’s also crucial that you look after your toothbrush properly. You should:


– rinse it thoroughly after use to prevent the growth of bacteria

– never attempt to sanitise it (e.g. with mouthwash or hot water)

– store it in an upright position

– allow it to air dry (closed containers can promote microbial growth)

– never allow the heads of multiple toothbrushes to touch


For more information on how to look after your bristles – and how often you should be changing your toothbrush – please feel free to get in touch at any time. After all, this is our area of expertise, and we’re always happy to offer advice. It may even be worth booking a dental check-up at our St Helens dental clinic to discuss your oral health and brushing routine in detail. Either give us a call on 01744 25776 or send an email to info@kilnlanedental.co.uk and we’ll respond as soon as possible.


How dentists clean teeth

Good oral hygiene is paramount when it comes to a healthy smile. But it doesn’t matter how well you look after your teeth. Even if you brush and floss twice a day, there will always be those hard-to-reach areas that are impossible to keep clean. That’s why, over time, you’re likely to get a build-up of plaque and will need to visit the dentist for dental cleaning.

For most people, professional teeth cleaning is recommended once every six months. But what exactly does the appointment involve? And what should you expect if it’s your first time?

A typical dental cleaning appointment

The goal of dental cleaning is to improve your oral health by removing dental plaque and calculus (i.e. hard, calcified plaque) from the surface of the teeth.

The appointment is usually with a dental hygienist and there are five main steps they will follow:

  1. A pre-cleaning examination

First things first, your dental hygienist will conduct a thorough examination of your mouth. This is to check for any oral health concerns that may affect the safety or effectiveness of dental cleaning. If an issue is detected, they may ask for the advice of the dentist – just to make sure it’s ok to go ahead.

A probe may also be used to check for periodontal pockets. These pockets can be found between the teeth and gum line and, if they measure more than 5mm, a deep clean may be recommended.

  1. Scale and polish

Most people have heard of a ‘scale and polish’.

This is the main dental cleaning technique employed by professionals. An ultrasonic ‘scaler’ is used first. This device creates mild vibrations, which successfully dislodge the largest pieces of plaque and calculus. It also sprays a mist of cool water to wash away the loose debris.

Then, finer handheld instruments are used to ‘scrape’ away the smaller and more stubborn deposits.

After each tooth has been scaled, an electric brush is used to polish each one individually. Again, this is a handheld instrument. It spins at the tip of the tooth and, by applying a gritty toothpaste-like solution (i.e. prophylaxis paste), creates a smooth and shiny finish.

Professional teeth cleaning at Kiln Lane Dental

  1. Flossing

The next stage of professional dental cleaning is flossing.

This is just the same as the floss you use at home. But by using their expert technique, the dental hygienist is able to get deep between the teeth and remove any leftover plaque or debris (from earlier in the cleaning process). They can also tackle trouble areas, which you may find difficult to reach yourself or have previously missed.

  1. Fluoride treatment

A fluoride treatment may then be applied.

Fluoride is a natural mineral, known to strengthen the teeth and help protect against plaque and calculus. It’s what can be found in toothpaste. However, the fluoride gel used in dental cleaning has a much higher concentration – and, therefore, its effect is much quicker and more profound.

The gel is placed into a flexible mouthpiece, which is fitted snugly over the teeth. Here it will be left for approximately 60 seconds, before it is removed, and you will be asked to rinse your mouth.

  1. Advice and tips

Finally, at the end of the cleaning process, the dental hygienist will offer tailored advice regarding your oral health. For example, they may offer tips on how to keep the teeth clean and reach tricky areas. Or they may explain the best methods to kill mouth bacteria and minimise the build-up of plaque and tartar.

This is also a chance for you to ask questions. Perhaps you’re unsure on the best way to floss? Or would like to know which toothpaste to buy? The dental hygienist has expert knowledge in this area and will be more than happy to answer your queries.

Protect against oral health issues with professional teeth cleaning at Kiln Lane Dental

Book your dental cleaning appointment today

To help maintain a bright and healthy smile, professional teeth cleaning is just as important as your routine dental check-up as well as your at-home brushing and flossing. It’s a quick and painless appointment – and, here at Kiln Lane Dental, we have a range of dental hygiene treatments available to treat a viariety of oral health issues and suit all preferences and requirements.

If it’s your first visit, we typically recommend the ‘Classic Clean’. This is a convenient 15-minute session, that will get rid of stubborn plaque and leave your mouth feeling revitalised and refreshed.

For those who need a deep clean, we also offer longer sessions – including 30 and 45-minute options – which combine industry-leading scale and polish techniques and whitening, to restore the tooth’s shine.

So, why not get in touch today? To find out more about how dentists clean teeth – and book an appointment at our St Helens dental practice – simply give us a call on 01744 25776 or send an email to info@kilnlanedental.co.uk.